 I am going to preface this article by saying that this has been four weeks in the making. After personal experimentation with my own diet I have come to some conclusions that I am excited to share with all of you!
When people come to me for nutritional help they obviously have some common goals. Weight loss, fat loss and muscle building are amongst the most sought after goals to those into fitness. However, many people also complain about bloating as well. The common aggravation usually manifests itself in the following manger: “I eat less calories than I burn and I am eating healthier foods. Why am I still feeling bloated and retaining water?” I used to not put much thought into this issue until it affected me directly. Just like those who asked me this same bloating related question, I too was struggling with doing everything by the book diet wise, but still dealing with bloating and water retention. So, a few weeks ago I decided to find some answers. Most of my solution is contrived from common sense and knowledge. Basic principles I have lived by for years. However, the real difference maker has been understanding the relationship between sodium and potassium, and once you do it can change your dieting life forever. The first piece of advice I will give to someone who is looking to engage in healthier eating habits is to increase their water intake. The usual recommended starting point is to drink at least half your bodyweight in grams. I am not going to get into the multitude of benefits that come with drinking water. I could do that until I’m blue in the face. However, what I will say is that a simple way to look at it is that you need to consume water to properly regulate the water in your body and adequately flush it through your system. Now that I have addressed water intake you can begin to see where the problem may be developing. Here is some basic chemistry. Water is heavily attracted to sodium. So, while drinking all this water is great for you, if you are consuming too much sodium this dreaded bloat would take place. Here is where it gets interesting. Potassium is the antithesis of sodium, meaning that while sodium traps water molecules, potassium helps regulate them throughout the body. So, while the FDA and American Heart Association recommend the average person consume 2,300 milligrams of sodium, I have found that is equally important to try and match the number of milligrams of potassium you consume daily with your sodium intake. Potassium is harder to come by than sodium. Quality fruits and some vegetables contain large amounts of potassium, which will in turn introduce better quality foods into your diet. In the past few weeks I have had great success with regulating my water by upping my potassium levels and bringing them closer to my sodium levels. I have also limited my sodium intake by avoiding table salt and utilizing leaner protein sources versus red meat. MyFitnessPal is a great app that can help you track your sodium and potassium. Lastly, you can find some foods lower in sodium and higher in potassium from the Harvard School of Public Health!
0 Comments
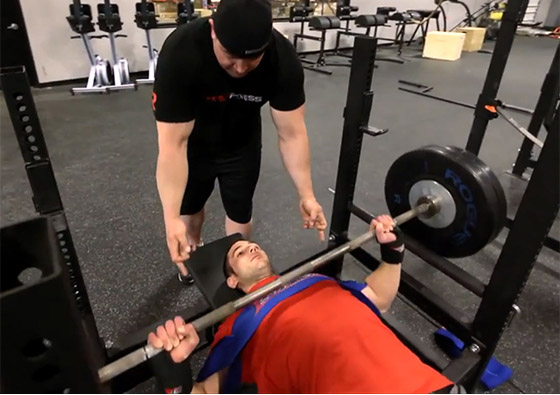 Lately I have been experimenting in order to find the best combination of exercises to use for the ultimate bench press warm up. I am going to provide my usual step-by-step warm up I use prior to my bench, and I think you will find them very helpful. Basically, the idea is to mobilize the shoulders and chest with a few static stretches, activate the shoulder and upper back musculature with a couple different dynamic exercises, and then rehearse the movement pattern and excite your central nervous system. Oh, and I have also found a bicep pump to be extremely beneficial as well. But, I will explain more about that later.
Static Stretches As I mentioned, I begin each warm up with a brief stretch of the pectoral muscles as well as the shoulders. Many people in this field feel that static stretching limits performance and should only be used as a means for recovery. However, they are mislead and simply need to understand that static stretches are fine and actually needed as long as they are followed by dynamic activation and a heightening of the central nervous system. Mobilizing the chest and shoulders is key in allowing mobility throughout the entire range of motion.
Shoulder Activation Like I said, static stretching can be extremely helpful prior to training, but it must be followed by activation. I like to perform each of these for 1 set of 10 repetitions.
Movement Rehearsal
Central Nervous System Activation I am going to provide a few of my favorite nervous system exercises, and you can use whichever one you seem to have the most success with. Perform 2-3 sets of 3-4 repetitions.
Bonus Upper Back and Bicep Pump Not many people understand the importance of the upper back during the bench press. To create proper torque you must externally rotate your shoulders and retract (pinch) your scapulae. Activating your back properly will aid tremendously in the bench press, and is something I have utilized successfully in my own training. In addition to this, a biceps pump can also have an immediate impact on bench press performance. For example, most big time power lifters have large bellies. They take big, deep breaths and utilize their bellies as a slingshot to press off their knees and quadriceps and propel them through the bottom of their squat. Think of the biceps in the same way. Having a bicep pump can act as a slingshot to press your arms back into lock out and help your bench. With both of these exercises, look for 3 sets in the 12-15 repetition range. We want high volume to give us the necessary activation and “pump,” in both areas.
Now that you have properly mobilized, activated, and gotten a tremendous arm and upper back pump your ready for the best bench press performance of your life. Enjoy! So, last but not least in our series regarding form and technique for the major “big three” barbell lifts is the squat. Many people hold the squat in high regard. Athletes call on squats as one of the main tools to develop lower body strength and power and bodybuilders utilize them to build massive legs. However, many people are mislead and often do not practice proper form and technique. In light of this, results are not maximized, and neither is performance. In addition, injury can occur and sometimes can be major. In order to ensure you are performing the squat in a proper manner, here are some technique considerations and cues that will help you get in the right position.
Feet Shoulder Width Apart While comfort is also important for maximum efficiency, a stance that is too wide or too narrow can make it more difficult to generate necessary torque. We will see how this comes into play with our next cue. Screw Feet To The Floor (Tear The Giant Piece of Paper) As I mentioned above, torque is a necessity will all barbell lifts. With the squat, proper torque will help place your hips, knees, and back in the right position and limit unnecessary strain placed on these parts of the body. A good cue to use to help generate torque is screwing your feet into the floor (right foot clockwise and left foot counter clockwise). Another way to think about it is to imagine that the floor beneath you was a giant piece of paper. If you wanted to tear that paper down the middle without moving any parts of your body, you would accomplish this by driving your feet and screwing them into the floor. Grip The Bar With Your Middle Finger On The Rings This will put your hands in the proper position on the bar Break The Bar To create torque in the upper body, you must externally rotate your shoulders. If you were to try breaking the barbell and rotate your right hand clockwise and your left hand counter clockwise you will achieve this. Unrack and Perform Lat Pull Down Imagine performing a lat pull down with the bar to properly engage your lats and ensure that your elbows are in and remain under the bar Let Your Hips Lead First The bar is on your back, you have taken it off the rack, and you’re ready to squat. It is imperative that you load most of the weight onto your hips, glutes and posterior chain instead of your knees. A good way to cue this and make sure your knees to not move forward and take on undue stress is to cue the hips to move first. The first part to move will take on most of the load, and continuing to sit back and drive back with your hips will make sure that your knees to not cast forward. Chest Out and Drive The Bar Straight Up These cues are critical to promote proper posture throughout the lift and make sure that your upper body does not fall forward as you return the weight from the bottom of the squat. Driving your chest out and returning in a straight line exactly from where you came will help keep your upper body in the proper position. 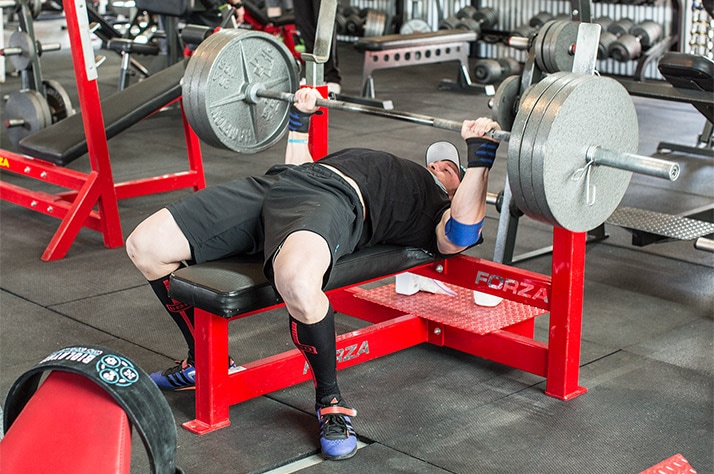 This week I break down the proper step-by-step form and cues to help you perform a safe and much more effective bench-press. One of the biggest pieces of advice I can give is to not focus on or coach more than 2-3 cues at once. This will be overwhelming and hinder the actual bench press. Instead, find the biggest areas and flaws that need work, and aim to be more attentive to them. Lastly, this is a breakdown of a more conventional bench-press. One I would teach to athletes and general clientele. I do not consider myself an expert on powerlifting bench press style (while I also do not admonish this style in anyway whatsoever), and prefer to teach my athlete’s and clients a more standard technique that does not over emphasize an unnatural arch.
Feet Firstly, the most important thing I want to emphasize is that your feet must remain planted throughout the lift. The biggest mistake I see with the bench-press is the tendency to have “dancing feet,” especially once there is any sort of struggle to complete a repetition. Feet Slightly Behind Knees This is one of the key proponents of creating a tight and natural arch in your lower back. Keeping your feet behind your knees will create a tightness and rigidity and help create a power source for your bench from your lower body. Heel Planted/Driving Into The Ground As I have mentioned in previous articles regarding deadlift form, creating torque is essential for all major barbell lifts. Keeping your heels planted can allow you to properly drive your knees out and “screw” your feet into the ground and create torque throughout your lower body. Bar Grip Unless there are major discrepancies between someone’s grip and more “conventional” positioning I will let an athlete grip the bar in a manner in which they are comfortable. Eyes Slightly Behind Bar To ensure a proper bar path and a lack of disturbances from hitting the hooks on the power rack, it is imperative to make sure your eyes are slightly behind the bar when you lie down on the bench. Bend The Bar Much like proper positioning of the feet can help create torque throughout the lower body, cuing the hands to “break the bar” can lead to proper external rotation of the shoulders and essential torque creation in the upper body. Much like how screwing your feet into the floor calls on a clockwise rotation of the right foot and counter clockwise rotation of the left foot (which will lead to external hip rotation and torque), breaking the bar will lead to this same essential movement in the arms and shoulders. Glutes and Lats Pinch Glutes This will help create the natural arch I mentioned earlier. Pinch and Bring Down Shoulder Blades Again, this will help create external shoulder rotation and the necessary stability provided by proper torque generation. Perform a Lat Pull Down With The Bar Essentially this is a way to cue proper lat engagement. If you have ever done a lat pull down before you know that your lats lead the movement and are the primary mover. Pulling the bar in the same manner you would during a pull down will help drive your lats into the bench and provide much needed added stability. During Lift Drive Chest Up To Meet The Bar This can slightly shorten the range of motion and also aide in creating torque Triceps To Lats/Elbows Straight Forward Cuing to keep the triceps close to the lats or driving the elbows forward will ensure that the shoulders remain in a position that will not hurt or damage them. Pressing Cues Feet Through Floor As I mentioned before, maintaining your foot positioning and contact with the floor is essential. This is also a good way to ensure you continue to drive and finish throughout the latter portions of the lift. Drive Head and Back Through Bench This will also help preach unconscious (basically these final cues will help finish off the lift and reach the point where the final drive is second nature) drive throughout the last stages of the bench. This will also help maintain stability. |
AuthorSGerry DeFilippo: ISSA CPT- CPPS, AAPS. Founder/Owner: Challenger Strength. Archives
October 2020
Categories
All
|
 RSS Feed