|
Last week, Dr. Anthony Falco discussed the basics of heart rate training and how to properly calculate your resting heart rate and maximum heart rate. Once you determine these numbers you can properly utilize heart rate monitors to enhance your training. In athletes, this can be tremendously useful, as it will allow them to better determine if their aerobic training is focused on recovery, maintenance, or aerobic improvement. For the sake of this article, we will be focusing on aerobic improvement. To improve an athlete’s aerobic capacity you must understand the percentage of maximum heart rate needed to reach the improvement threshold and also how to use exercises which best work towards achieving that same goal. Proper Heart Rate Percentage For Aerobic Improvement In the past I discussed using the aerobic capacity system to help aide in recovery for athletes. For recovery, it is best to work in a 60-75% range of the athlete’s max heart rate. However, the range for aerobic improvement goes as high as 85-90% of the max heart rate. Basically, apply Dr. Falco’s formula for your maximum heart to these percentages and you can find the best threshold for an athlete to work in to improve aerobic capacity. For example:
How To Construct A Proper Movement Pattern Aerobic Program As I previously mentioned, the movement patterns are great to use for aerobic improvement for a number of reasons. In addition to helping improve an athlete’s working capacity, you can also use this as extra time to drill home proper form with the main movements. However, it is extremely important to note that an athlete must show proficiency in these movements prior to using them, as it is never ideal to learn a new skill or movement in a fatigued state. For example, an athlete who cannot perform a proper bodyweight squat should not be allowed to use this movement in an aerobic circuit as they will be susceptible to not only injury, but can further program their nervous system to perform the movement incorrectly.
The most important thing to remember here is that you can find success with a multitude of different methods. Once you have determined your proper heart rate the main goal is simply stay in that zone and maximize your aerobic capacity. Movement pattern circuits are simply a great alternative to use because they can further solidify the proper form and technique of the most important qualities and movements for an athlete. Gerry DeFilippo
0 Comments
In the next installment of our supplemental and accessory exercise series I give some insight into my favorite posterior chain activating accessory exercises that can contribute into improvements with the hinge movement pattern.
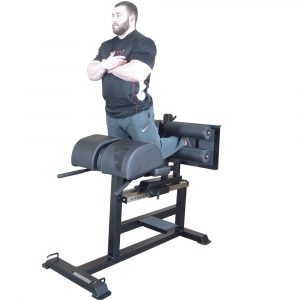
Main Areas Involved In The Hinge/Deadlift The posterior chain (glutes, hamstrings, external rotators etc.) is the main mover of the hinge movement pattern. Thus, it is important to implement accessory exercises into your program that target these muscles. While supplemental exercises for the hinge almost always include the movement itself, the accessory exercises do not have to. Thus, I included the straight leg deadlift (or RDL) in my favorite supplemental exercises, but none of my accessories will be performed with the same pattern or in the same plane of motion as an actual deadlift. Hip Thrusts There are a couple reasons why I love hip thrusts. First and foremost they are great because they can be done with multiple types of equipment and as a result can be a staple in any program. Bands, dumbbells, barbells, medicine balls and plates can all be used to perform hip thrusts. The second reason I love them is because they allow you to get a great feel for finishing your hinge. Essentially, cuing a squeezing of the glutes at the top of a hip thrust not only provides hypertrophic benefits, but also can teach athletes and lifters to drive their hinge all the way through with their glutes instead of hyperextending at their lumber spine. Glute Hamstring Raises I enjoy glute hamstring raises because they are essentially fool proof in terms of requiring posterior chain activation. Basically, in order to be able to do them you need to fully contract your hamstrings and glutes. Other accessory exercises may require a mastery of the movement in order to fully engage the posterior chain, but glute hamstring raises do not. Furthermore, glute hamstring raises also can be utilized to rid of lumbar hyperextension throughout the completion of a hinge. In today's installment of the supplemental and accessory exercise series, I discuss the hinge pattern and my favorite exercise to use early on as a regression to teach the hinge, in addition to my two favorite exercises used to build the barbell deadlift.
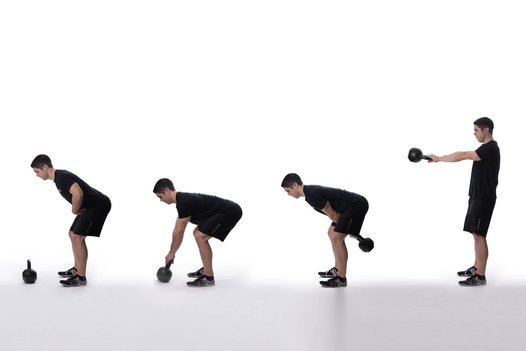
Using The Kettle Bell Swing To Teach Proper Hinging Teaching a proper hinging of the hips while keeping the spine neutral can be very easy, but often times it is made to be much harder than it actually has to be. Once a proper hinge progression is taught (I may discuss this in a future article), the kettle bell swing is one of my favorite exercises to use in order to help rehearse the pattern, as it is very repeatable and simplified. In addition, using the kettle bell swing can ensure that you are not placing tremendous amounts of stress on your spine if your form is not fully cleaned up and mastered. Basically, the downward momentum of the kettle bell during the eccentric portion of the range of motion forces the hips to hinge into proper position. I also like the kettle bell swing because in order to achieve a full lockout with your arms and drive the kettle bell to the top you will need to finish your hinge (think a driving forward of the hips and a tensing of the glutes as you get to the top and lock your knees). When using a heavier kettle bell your arms may not be enough to drive it up alone, and this can really require you to make sure that you are properly finishing off your hinge. For beginners and lifters or athletes who are trying to build strength with this range of motion I would recommend using repetition ranges in the 8-12 range. This will help pack on added muscle mass in the posterior chain (glutes, hamstrings and hips), which will allow strength potential to be much higher when moving on to a traditional deadlift. Two Best Exercises To Build The Hinge and Deadlift (Romanian Deadlift and Rack Pulls) As I said early on in this blog series, our goal with supplemental exercises is to build muscle and strength with exercises that involve the same muscle groups utilized with primary movements, but is also performed in the same movement pattern. Thus, supplemental exercises to build the deadlift should incorporate a hinge and only a slight alteration from a tradition full range deadlift. For example, the two exercises I am about to discuss differ from the deadlift in a few minor areas, which I will explain.
Building Your Program With Supplemental and Accessory ExerciseS (Week 1 of An 11 Week Series)4/27/2017 In terms of programming, one of the main components of building an ideal program comes from a sound and consistent template. Over the next 11 weeks I will be breaking down two tremendously important aspects of a training program, which are supplemental and accessory lifts. Basically, there are five fundamental movement patterns that are almost always involved in our training.
They are as follows:
Each of these movements can be improved upon via supplemental and accessory lifts. Essentially, supplemental lifts are of the same type of pattern as the primary movement pattern and help build that movement pattern directly. Think of it in the sense of a training family tree. The fundamental movement patterns are the ancestors of the family. Each movement pattern then branches off into supplemental exercises, and from those supplemental exercises come a multitude of accessory exercises. Accessories are more specific and target particular muscle groups to strengthen the supplemental and then back up to the fundamental movements. Breaking Down an Effective Training Program Now that I have shed some light on supplemental and accessory exercises, I would like to briefly detail a skeleton or template of these exercises and how they should be utilized for performance benefits. You will see that this is a fairly simple concept and it can be used and repeated for all of the fundamental movement patterns. In addition, having a template allows us to collect a database of exercises for each category and as a result we can keep our training fresh by utilizing different variations for similar effects. The template breaks down as follows:
What To Expect Moving Forward Over the next ten weeks I will write separate articles for my favorite supplemental exercises for each of the fundamental movement patterns. Once I am through with that, I will do the same with accessories. That is a total of 10 articles, two pertaining to each movement pattern. At the conclusion of this comprehensive breakdown you will be able to use this template I provided and utilize my favorite exercises. This week I address the important cues and form considerations for an effective, safe and pain free deadlift. Implement these to ensure that you keep your form in line and most importantly avoid costly injuries to your spine.
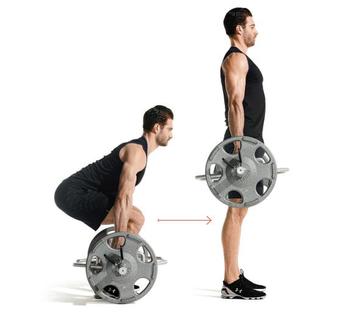
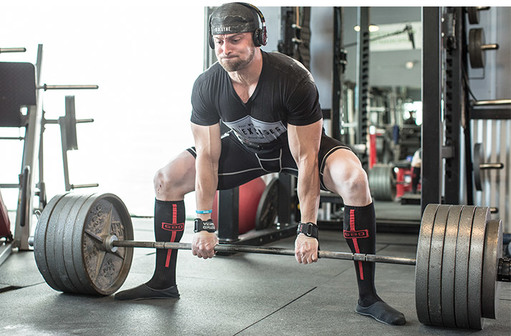
Feet Shoulder Width Apart Now obviously you can use different deadlift alternatives such as the sumo deadlift. However, for the sake of argument, I will be explaining cues for a conventional double overhand deadlift. With that being said, lining your feet up shoulder width apart is the recommended position for the conventional deadlift. “Screw Feet Into The Floor” I would have to post videos, detail a full program with appropriate progressions and write multiple articles to explain how to get your spine neutral when deadlifting (HINT: This might be coming soon). Anyway, one of the truest ways to help maintain a neutral spine is to develop proper torque with your lower body and externally rotate your hips. Bar 1-2 Inches From Your Shins Tracking the bar close to your shins is another way to ensure proper torque creation and the ability to maintain a neutral spine or “flat back.” By doing so, you allow the shoulders to be externally rotated instead of rounded forward, and the lats can also be engaged. Double Overhand Grip For non-power lifters and beginners a double overhand grip is perfectly acceptable. This will ensure that you develop proper grip strength early on. As you progress and work towards higher weights a transition to a mixed grip in which one hand is pronated (palm up) and one hand is supinated (palm down), can be considered. “Pull The Slack Out Of The Bar” Earlier in the article I mentioned torque. Well, these next two cue help create proper torque and a neutral spine. Pulling the slack out of the bar simply means to get in your proper deadlifting position and literally pull the bar as hard as possible without moving it from the floor. Doing so allows you to set your shoulders and back properly and makes for a safer and much more efficient lift. Engage Your Lats Again, here we have a cue to help keep your spine neutral and back flat. Act as if you are performing a lat pull down and contract your lats. This will help keep your back in proper positioning while you go through the full range of motion. “Chest Up” Cuing an athlete, or even instructing yourself to keep your chest up can also significantly help with positioning and posture throughout the lift. Doing so can help you avoid a rounding of the upper back and a rolling of the shoulders forward, which is essential to a safe and pain-free deadlift. Pinch Glutes At Lockout, Do Not Hyperextend One of the main mistakes I see with the deadlift is a misconception of what is actually done at the lockout. Many lifters will hyperextend at the lower back and place far too much stress on the lumbar spine. However, the proper technique calls on glute strength and action. This is why it is so important to work glute hamstring raises and hip thrusts into your program as strong and developed glutes are pivotal at the top of the motion. Essentially, pretend you are doing a hip thrust or glute bridge at the top of the motion to properly perform a lockout and remember to squeeze those glutes to finish off your deadlift! “Leg Press The Bar Back To The Floor” Lastly, it is essential to return the bar to the floor in a safe and effective manner. Often times many lifters will not bend at the knee appropriately and instead perform more of a stiff leg or Romanian deadlift. To combat this, once the bar makes its way back to the thighs, act as if you are performing a leg press and slightly bend at the knee as you move the weight past your lower thighs and down past your knee to the floor. The deadlift is one of the most popular and demanding compound movements in the world of strength training. Ask anyone who has ever grinded out a new personal record or an intense and heavy high repetition set of deadlifts, and they will surely tell you it is a grueling full body workout. Well, here I am with my five favorite ways to augment your deadlift, and build more stability and strength throughout the key muscle groups that play a pivotal role in maintaining proper form throughout the entire range of motion. What I just said is very important. Yes, I am here to help you develop a deadlift that is the equivalent of picking up your eco friendly buddy’s Fiat when he insists he can drive in a foot of snow in mid January. A powerful deadlift is obviously a goal for many lifters and athletes. However, even more important than this is that these accessories will help you maintain a neutral spine throughout the full range of motion, and help you avoid the back injuries many people suffer due to poor form and positioning. Now, get ready to read and implement these accessories into your program before you head in for another battle with the barbell!
Bent Over Barbell Row As I have mentioned in my previous article about building a better bench press, the latissimus dorsi (more commonly known as the lats), are also a significant factor in the deadlift as well. Properly engaging your lats before you even attempt to pick the bar up off the ground is key in not only aiding your power, but also giving you the ability to maintain a neutral spine. Engaging your lats helps transition torque created from your grip on the bar and externally rotating your shoulders down the remainder of the kinetic chain. Obviously torque is important (we will get to this in future articles), and getting bigger and stronger lats can go a long way in helping create torque while also protecting your spine. Now, if you have ever seen a barbell row performed in a bodybuilding sense this is a bit different. I have found that staying a bit more upright better mimics the movement of the deadlift. Essentially, I will hip hinge, getting my spine into a neutral position, and then perform the row. I have found this to be effective because the lats are often lost once the bar moves past the knees in the deadlift. So, performing the bent over row in a similar position and moving the bar in a range of motion that tracks your thighs helps place emphasis on engaging the lats throughout this portion of the lift. Stiff Leg Deadlifts or Romanian Deadlifts Firstly, I honestly have not found one official name to refer to these. Half of people know them as stiff leg deadlifts, and the other half know them as Romanian Deadlifts. When I write my usual programs I usually include both names so my athletes do not give me a blank stare of complete and utter confusion. Side note, my goal is to try and get that look as few times as possible. I will keep you all updated on how that is working out for me. Anyway, I digress. Performing Stiff Leg or Romanian Deadlifts are a great accessory to target the hamstrings, which are a primary agonist muscle during the deadlift. Basically, this means it is one of the main muscles to contract during the movement. Grab a barbell and with stiff legs, hip hinge with a neutral spine and lower the bar a little past your knee cap until you feel a great stretch in your hamstrings. One piece of advice I will give with this is that if you have never done them before, please use a lighter weight. I do not want you to compromise the position of your spine because without flexion in your knees it will be much harder to maintain a neutral spine position. Face Pulls/Band Pull Aparts Let me tell you this from experience. You could get your spine into a neutral position, and master proper torque creating techniques, but as you approach much heavier poundage in the deadlift it is very difficult to not round your upper back. You will probably be able to maintain a neutral position in your thoracic and lumbar spine (mid and lower back), but more often than not, the upper areas of your thoracic cervical spine (upper back) will be the hardest to maintain. This is caused by a lack of muscular strength and endurance in the scapular area, in particular the supraspinatus, rhomboid, and scapulae musculature. The average lifter avidly targets and grows their chest, and thus creates and imbalance between their chest and upper back strength, in addition to tightening their chest to a point where they ruin their posture. Face pulls and horizontal abduction (band pull aparts) are a great way to not only increase the strength and endurance of this musculature, but to also improve posture. For even better results, implement an isometric hold (a hold upon completion of the contraction and before you begin the eccentric portion of the movement). Hip Thrusts Here again is another exercise that targets an important aspect of the deadlift. As I mentioned in my article for bench-pressing, sometimes the hardest part of a movement is the lock out. Many lifters can move through the first three quarters of the movement effectively, but get stuck at the top. For the deadlift, the glutes are key in achieving an effective lock out. Basically, position your upper back on a bench at a level right below your scapula. Place either a dumbbell on your pelvic area or use a barbell. Perform a basic bridge and be sure to squeeze your glutes and properly engage them at the top of the movement. You will not be sorry! Deficit Deadlifts Last but not least, I give you a way to improve your drive off the floor if you struggle with that particular part of the movement. Perform a deadlift in the way you usually would, but stand on a slightly elevated surface (such as placing one or two plates under your feet). This will increase the range of motion in the movement and ensure that you create the necessary torque to drive the weight off the floor. By making the range of motion greater and thus the lift more difficult, you will increase your ability to improve any problems you have getting the barbell off the floor when you perform the deadlift conventionally. Go get stronger and build a better deadlift! |
AuthorSGerry DeFilippo: ISSA CPT- CPPS, AAPS. Founder/Owner: Challenger Strength. Archives
October 2020
Categories
All
|

 RSS Feed